When I started making music in the late 1980’s, good Reverb units were still very expensive. If they were anything near affordable they sounded pretty poor. Nowdays every DAW has two or three decent to good Reverb units on offer (yes even Reason with the addition of REs). But do you know that you can build your own simple Reverb unit?
So why write an article on how to build a Reverb unit that isn’t going to be perfect? Well two reasons:
- Building something from concept to completion makes you learn so much more than blindly twiddling knobs on something that appeared before you like magic. You have to get a very clear idea of how the signal flows from place to place and action to action. Just drawing an effect unit like a flowchart is a revealing process. Building it and making it usable (or even good) is another.
- Professionally released Reverbs tend to sound too nice too much of the time. Huh? Well if a “professional”, and who would buy a basic or amateur unit, unit isn’t to get panned (no pun here I’m sure) then it can’t have too many rough edges. Rough edges are sometimes just what music needs. Lou Reed couldn’t ever really sing but a world without his songs would be a tad bland.
So if you would like to know a bit more about Reverb and end up with one of your own then join with me. I’m using Reason but you can follow along with any system with a good amount of modularity. If you are in VST-land then grab a copy of SynthEdit as it is a hoot once you get past the initial panic. Trust me on this. Anyway onward…
BEFORE YOU DO ANYTHING PUT A BRICK-WALL LIMITER ON YOUR MASTER OUTS AS AT TIMES THIS WILL GET UGLY AND UN- CONTROLLED – YOU HAVE BEEN WARNED. Also this project will take quite a lot of time so if you can’t commit about half a day maybe this isn’t for you.

- Create a New Combinator – wire an external instrument in so you have sound. This is an effect unit you are building so you don’t want an instrument in the Combi box
- Flip your Rack & Insert a Line Mixer
- Insert a Spider Audio
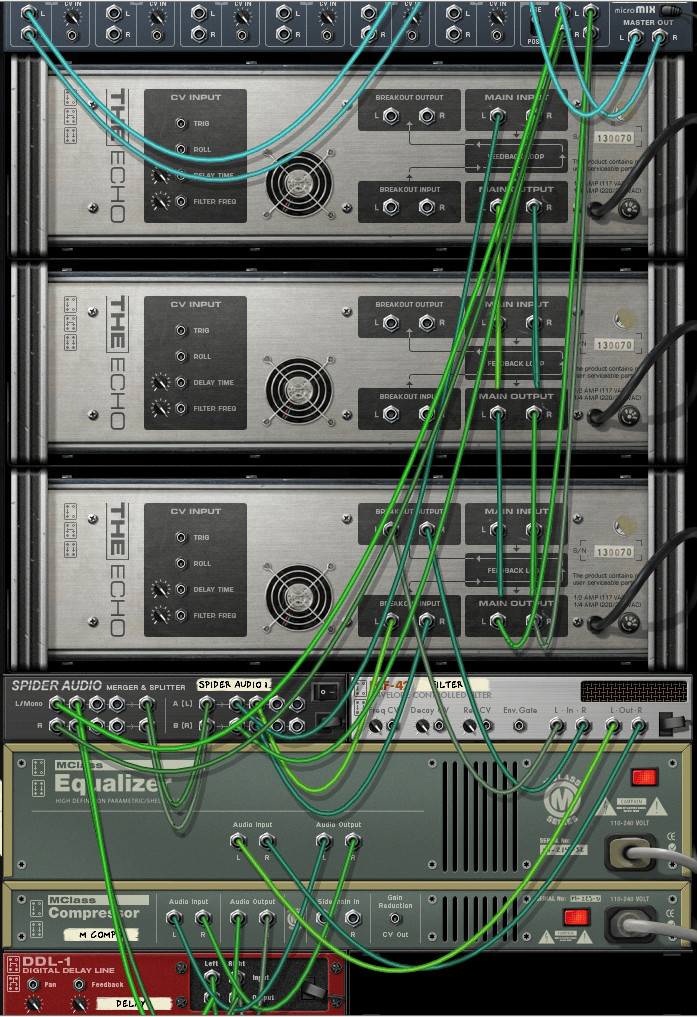
- Wire the FX Send from the Mixer to the Spider Merger In 1
- Wire the Spider Merged signal to the Spider Split Input
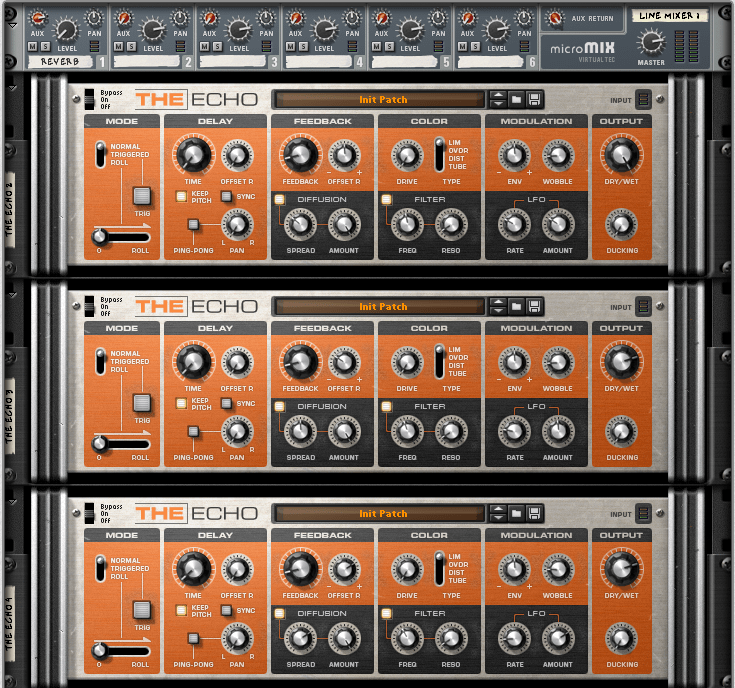
- Insert 3 Instances of The Echo (modulating delay)
- Wire the first Spider Split Out to Echo 1 In – the three units should now cascade one to another.
- Wire Echo 3 Out to Mixer FX Return – you should now have sound passing through
- Flip your Unit to the front and set the Dry/Wet Mix on your Echo units 1) 100% Wet, 2 & 3) 50% mix
- Turn off any BPM Sync and set your three Echo Delays to very low numbers, try 40, 48 & 63 milliseconds consecutively
By now you should have a rough echo/reverb space appearing. It may whine and rattle but hey so does your room if you clap your hands and listen. Now we can start to tame that and make the unit more versatile.

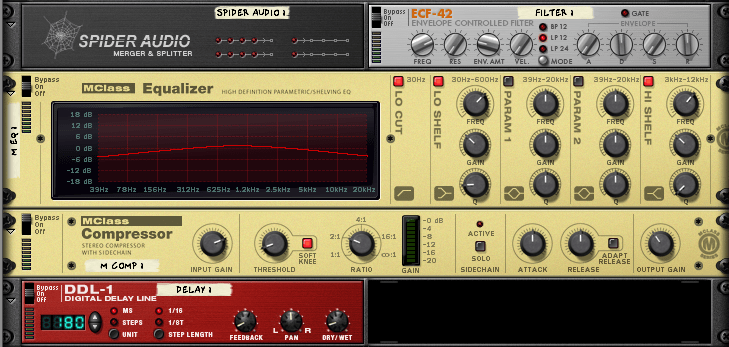
- Flip the Rack back and shift-Add (no wiring) a Low Pass Filter
- Wire the Echo 3 Breakout Out to the Filter In – not all delay units will do this so you will need to find another method using other mixer options, this is the joy of architecture.
- Add an M-Class EQ after the Filter
- Add a Compressor
- and finally a simple DDL-1 Delay Line
- Wire the output of the DDL-1 to the Spider Merger In 2
- Wire the Spider 2nd Split Out to the Echo 3 Breakout Input to complete the chain
- Flip the Rack back to the front
- Set the Filter Type to 12db, Cutoff to about 75% and the Reso to 0% – we don’t want ringing
- Switch in a Low Shelf Cut of 6db at about 100Hz to stop your Reverb from being too muddy
- Switch in a High Shelf cut of 6db at about 7kHz to roll off some ringing
- Dial in 6db of Gain to the front of the Compressor, set the threshold low (-32db here) with a Soft Knee and a Ratio of 2:1 for a soft smooshing. Leave the Attack & Release slow and then lop 3db off the output.
- Set the simple Delay Line to about 150ms with a low Feedback and about a 25% Mix.

This second chain lives inside the third Echo and creates a more complex tail. You could also loop this chain back to the first or second Echo. You now have an almost passable space to pop instruments in. Yep I know it still tends to ring and whine a bit too much. We can work some more on that.
- Dial in a fair bit of Modulation to all thee of your initial Echo units – I prefer to make the amounts more pronounced the further down the chain the signal travels as this is what a room does to a sound, making it smear more as it bounces around. This reduces the metallic ringing sound some.
- Using features of The Echo in Reason I switch in the Filter and again use a slightly lower cutoff for each Echo unit to mimic our pseudo echo (tee hee) having damping properties and to help minimize ringing from all the delays sounding the same
- Another cool feature in The Echo is the Diffusion effect, I turn this on and spread the Spread as the chain progresses – if your echo doesn’t have this effect then fear not, simply draw up a more complex architecture with a few more delay lines (or cheat and use a tiny Reverb or two to toss your delays around a bit)
You are now fundamentally done. Except you will want to put controls on your Combinator (or face plate). Try these:
- Size – control the 3 x Echo lines with a range of something like 1ms – 120ms, remember to make each later unit a different range to create lots of oddly spaced reflections; just like your snare or piano is bouncing off 6 surfaces (and your head). For the last Delay line use a larger range like 64ms – 425ms for when you want to fool yourself you are dance hall material.
- Decay – this ain’t no real room so the only way we can set how long the Reverb rings for is to use the Feedback controls. This is where if you overdo it you will create some nasty FEEDBACK HOWLING so please be careful.
- Damping – will control your Filter and High Shelf EQ. You may have wondered why I used two devices instead of just one. Well that is me being clever; I figure that by using two units set to differing amounts then they will create an oddly shaped curve. Feel free just to use one unit. Using a 24db slope did sound nice.
- Tail Balance – sure you don’t find one of these on many Reverb units but what this is set to do is change the Wet/Dry Mix of the second and third Echo units to allow you to play with defining the space more. It’s like changing the type of space in some dramatic ways.
- Delay Button – switches the mix of the final Delay Line from about 12.5% to 62.5%. Notice how this changes the shape of the Reverb space or tail.
- Compression – switch the Compression in and out. You’ll be amazed how this changes the shape of the Reverb from Concave to Convex, just like adding an envelope.
- High Pass – has two Hi Pass frequencies at 80Hz and 220Hz to let you choose how much murk you want to to scoop off.
- Send FX – most Reverbs will be used as a Send FX so you only want the effected sound to come out. This uses the Mixer Send as Pre Fader and simply switches the Channel Level from 100 – 0. If you were using this unit as an Insert then turn the Send FX button off and adjust the Mix at the Line Mixer Aux Send.

You have built a Reverberation Unit at least the equal of an off the shelf unit in the 80’s. Sure it sounds more Radio Shack than Lexicon but this is a character effect you can use to get special sounds or when you want something no one else has.
Take some time to play with your new Reverb for a few hours or even better over a few days. Switch in and out with subtle settings and be amazed at how such a rough effect can add a lot of liveliness to sounds. I love how it can take a Jarre style synth string/brass playing 1st & 3rd as he does in Oxygene and suddenly add zing to the sound and how static synth drums get more engaging.
The Synth Space Reverb Combinator for Reason is here
Have fun
🙂
