So you read the first of these twin posts and wondered why I extolled the virtues of, and even had you making, Small Drums when the tile was BIG Drums. Am I mad? Well that is possible but my approach is this: if you can make small drums work well and have punch in the mix then you are half-way to making big drums that work.
More Theory
You can’t really make big drums in a mix that will work on the radio. Que? Well music only has so much bandwidth, measured in decibels (db) and a big drum would be a loud one, one that uses lots of db bandwidth. As we also learned last week, sounds mask one another so a big drum will take all the sonic space you have so unless you have a song that is only a kick drum (“Blue Monday” anyone LOL) then you gotta get sneaky. Trick people into thinking they hear a big sound even though it is half a big sound.
Once you have the sense of making a small drum have punch in the mix we can scale up.
You will notice that I ask you to make the sounds instead of loading a sample. Two reasons, samples tend to be processed so you have less to play with and the biggie here is that what you learn making sounds will set you up really well to use samples or even better make the sound yourself (and quickly too).
Practice
I’m using Reason units here but you can follow with something else if you like. Try this: make a nice 909 type sound, (don’t cheat with compression etc till later).
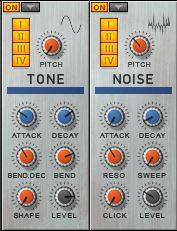
Note the Attack is slow and the Decay is longer to avoid too much click and let the bass breathe. A lot of Pitch Bend with a fairly fast fall gives us that dramatic sound the 909 is popular for. The Noise portion gives us back some nice mid-freqs to drag the sound forward.
Compression
Compression is one of the first things talked about in drums; “ooh that compression really gives that drum punch”. Does it really as compressors are slow old things and drums have lots of pokey stuff right on the front, so that stuff gets let through and then we turn down the body of the sound where the oof lives? Well It can do if you get everything else right.

Add in a Mastering Compressor, this fellow is pretty slow I know but that will be useful here. Turn the input Gain up plenty to get some volume happening to let the compressor dig into. Lower the Threshold to about 30db to create a dynamic range. A Ratio of 4:1 will do for now. Raise the Attack time till you have a decent click or pop coming through and I think set the Release to long for now. You should have a fair bit of downward movement on the meter and a pretty squashed sound.
If you find the compressor is squashing the start of the next hit then shorten the Release (and maybe the sound too).
Limiting
I like Brick-Wall Limiting as it lets nothing through. Blam, splat, pancake!!! Downside of that is you can lose shape in your sound. Hey presto, Compression becomes useful again to shape or re-shape a sound as we fool the masses that we are livin’ large.

Add a Mastering Limiter. Set this to Look-Ahead and the times to Fast. Wind up your Gain till you have a punchy sound. Now you may note that the Look-Ahead mode adds a 4 millisecond delay to the sound (how else could it know what was coming). You can either sample off the sound (boring and so 90’s) or turn on the Soft Clipping instead as that will in effect stop any overs by bending the signal at the cost of some distortion (that you probably won’t hear anyway). Goodie-o.
You will also have noticed that the kick sound is now longer; well just plain flabby. Go to the Decay of the Kik Tone and lower it to tighten your sound up. As you play with Attack and Decay settings on the Compressor you will also find differences.
Remember to do this IN YOUR MIX or you will fall in love with a sound that is magnificent on its own but useless in the mix. Remember that db bandwidth issue in the Theory above. Once you have some practice then you may make drums Soloed but still tune them in the mix to get the best cut and oomph.
Drum Kit
Now you will want some more sounds in your drum kit so go head and make a Snare, some Hats and anything else your twisted heart desires. You will find that if you try to force the whole drum mix through the same Compressor/Limiter chain you get something less desirable, as sounds crush each other. So now you will want to break hits out separately so you can maximize each hit and balance them up to get the feel you want.
You will note that the settings for a Snare are different and that less compression helps get more snap. You will probably also find that to make the kick seem bigger you want to lower the volume of the snare.
EQ
First thing you should notice is that we haven’t touched an Equalizer yet. We have NOT added any bass at all! Matter of fact we are about to cut some out as anything below about 40-50Hz is doing nothing but muddy up the mix and sap punch. Go on and add a High Pass Filter to just below the main kick and you are golden.

You will also see I have added a bit of boost at 2kHz as this helps drums to poke through the mix. If you overdo this they will sound papery (or trashy) but just a bit will pull the sound forward in the listener’s brain. And that is the whole point here.
Now you should have a drum kit that will be very intense in sound without throwing your VU Meter (and speakers) into next week.
Remember that it took me 20 years to get here so don’t whig out if you can’t get this in a weekend.
I have attached a Reason Combinator from this lesson to get you started. Set it to Run and then turn the main Effects Off button on and off to hear the dramatic difference and how the processing turns a cute electro kit into a stormer.
next you can learn how to make a Fuller and Louder Mix with Better Bass
