By the late-80’s people had started to use “MIDI Music” as a derogatory term. I understand because there was an ever-increasing amount of highly programmed or quantized material out there.
I don’t entirely blame composers as it was a new frontier where we could have all our parts perfectly in time, with no distortion. And even without having to leave the house to borrow an Orchestra – of people who charged us money to play out of time – sheesh!
Of course, the downside was that we started to hear a lot of very metronomic material with sounds that didn’t feel like they had much depth. The music itself was great but the delivery felt flawed. Listen to material like Larry Fast’s “Metropolitan Suite” and you’ll know what I mean. Great music, but you have to accept the delivery to hear it.
Detailed orchestral sample sets abound yet there is still an avalanche of material that sounds horribly “canned”. That goes for both MIDI Orchestral works and Synthesizer tracks. The biggest issue is not taking that extra time to create Expression in the performance. As mousers, we tend to hear what we hoped to have written as opposed to what we really did.
Breakdown Dead Ahead
Here’s a Movie Cue style piece I creatively named “Expression Test” as a test for myself to see how much more detail I could get from a piece using just one or two more levels of Expression/Automation in each instrument.
Now please be aware that I am not pretending to be a Master at this. I am not a great composer, but I am doing it and publishing my music regularly. This is designed to help you understand how to drive that extra magic from your existing synths.
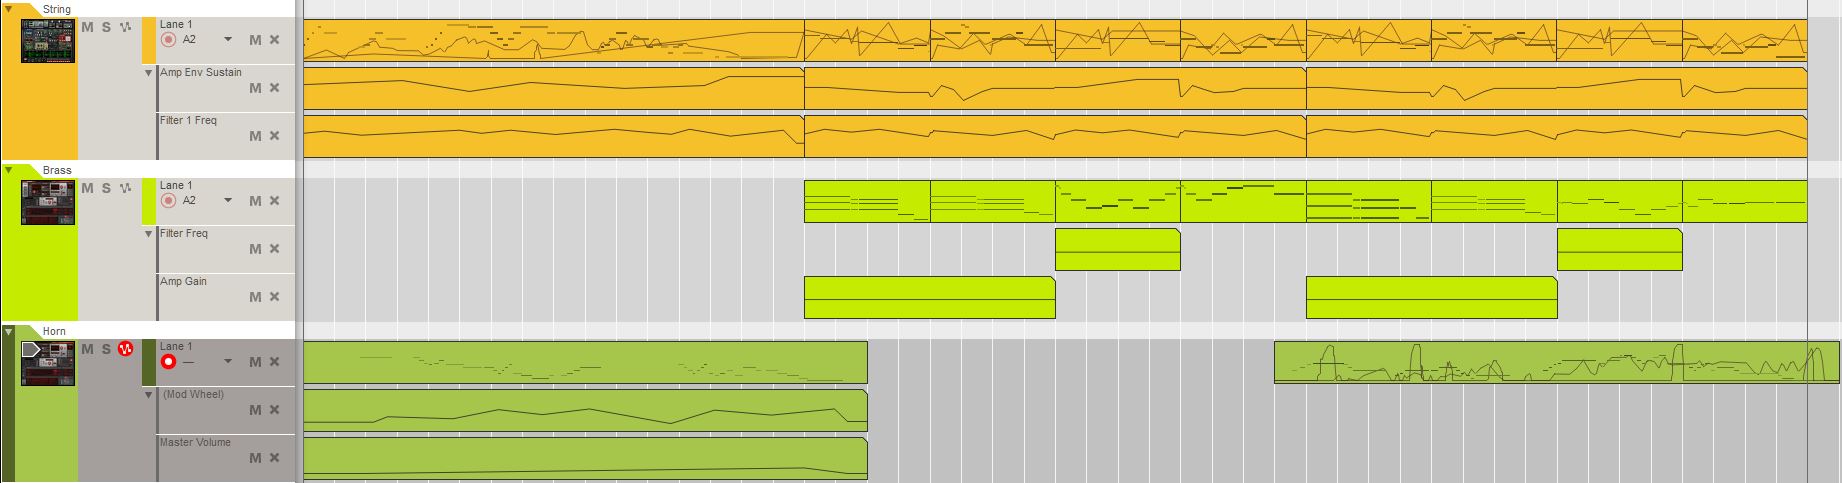
While this is pretty simple as Sequences go, you’ll notice a lot more squiggly lines denoting automation (or movement) of parameters in each part. For the uninitiated, this piece may pass as “real” instruments. Winning. This is because of the extra movement in the performance which creates depth. That extra aliveness reduces the amount of composing you actually have to do as each sound or line is already emotionally large.
Strung Out

The first instrument you hear is a “string” sound. The first section was played in live including Mod Wheel & Aftertouch data. The playing was deliberately not to a metrognome or even quantized, loose feel was the aim. The second section was moused in and loosened with a random timing Groove.
- Mod Wheel – Amp ENV Attack & Decay which allows for a great spread of articulation in the sound. From staccato to long & flowing.
- Amp ENV Sustain – adjusts how the sound holds on notes. Not as immediately noticeable but defines how the player “follows through” on the notes which adds “passion”.
- Filter Cutoff – changes the timbre of the sound. Not remotely new to any synthesist but I hear lots of people forget this when using sounds that aren’t supposed to be all-out synthy. It makes a lot of difference as you can “push” & “pull” the feel with tone. (same goes with volume)
- Aftertouch – sets Vibrato amount which flows really well as all I have to do is “lean into” my playing. It is far better than anything I’d mouse.
Sound Design: is initially really simple with a Saw OSC into a Filter. Most of the movement comes from the performance which is how it should be (and was in the 70’s). The odd thing is the Comb Filter. That is to add a bit of extra character. If the settings are kept conservative, it adds a bit of realism to the sound – just as you would get as the player wobbles back and forth in the room, creating sonic cancellations. The EQ finds the parts that reinforce the uniqueness (and violin-ness) of this sound and pushes them forward. It also gets rid of the lower Freqs that synths spew out but fiddles don’t. They reduce the “realism” of the sound so are best gone.
Brass In Pocket

You know I love synth brass. All brass really. This was all moused in and formed the core of the other musical lines from the strings and Horn. I used the same random Groove to loosen it up.
- Velocity – changes how fast the Envelopes speak. This is essentially the same as the role the Mod Wheel played in the String.
- Filter Cutoff – allows me to change tone which as well as the advantages above, lets me use this sound over a wider keyboard range.
- Amp Gain – is simply allowing me to adjust level as I find the right amount of “blow” for the section. I used the Gain pre-Drive as it could get ugly with chords.
Sound Design: It is all about the Envelopes with brass sounds. Brass is extremely expressive, especially seeing the instrument is made from solid metal. Most brass tends to blow a bit sharp at the note start so an ENV is used to push that. Overdrive is used because it adds a little something that you barely hear but is so lifelike as metal is not the smoothest musical resonator. Europa is great for sound design because it has those spectral filters that can do things like apply a resonator shape. A tight Unison also adds a bit more resonance to the sound. This sound was the backbone of the piece so I didn’t want to overdo it here, to let the other sounds play off it.
Bad To The Bone

This started as a flute line. And I had it sounding nice and flute-y, but it was the synthy Pan Flute thing. I didn’t love it. A twist & flick of the wrist and I morphed it into some sort of Trombone-ish sound which was far better.
- Velocity – handled the overall Amp ENV Attack. Note the other Envelopes didn’t move this time. Best not to use the same tricks on everything. Similar but different is the winning formula. Sounds like Metallica but isn’t worked really well for Megadeath.
- Aftertouch – let me push pitch up (like a Pitch Bend but more subtle). I also used the technique of being able to “overblow” a horn and ramp up the amount that the OSC wave was Noise Modulated. Makes it take that harder sound all horn players use.
- Mod Wheel – is typical Vibrato.
- Master Volume – is assigned but in effect not really used so we’ll speak no more about it.

Sound Design: is similar to the more general Brass above but notice that jagged looking ENV shape. A polite brass section playing evenly barely has this effect noticeable but when your horn man is doing his Slash-standing-on-a-piano moment, there is a lot of flapping of lips and almost outright resonant distortion happening at the start of that metal pipe. This envelope makes that sound. It is all to taste as it is performance all the way. The use of a fairly narrow Pulse Wave coupled with those modulations makes for the right sound. The strong EQ cuts let the remaining Freqs push forward.
Call It What You Want (The C&C Pump-It Mix)

This overall mix started out with the typical Bright As You Can thing. Sadly it sounded too MIDI as a result. Real sounds just don’t have all that extension in the highs. Leaving it there just makes it sound thin & fake.
I found I could roll-off the whole 18db at 3,700Hz and it still sounded good, musical clarity was all still there. My only concern with that aggressive cut was how it might translate from my clear studio speakers to the mid-challenged theater rig in the lounge. So I played it safe for now and settled for -3db – still a bit warm but clear & toppy.
The old Reverb-In-The-Masters trick I do like. Chaining one reverb into another (so long as they aren’t exactly the same) is instant thickness. Just be sure this Reverb is really short and tight (avoiding too much in the lows). I always prepare this verb at 100% Mix so it isn’t going to be mush. Then when it sounds nice I dial in the right balance.
A bit of Saturation adds sparkle to it all and once the final levels are just tipping the Limiter I’m done.
