
This will be a long article (aren’t they all with me) but I will cover a lot of ground. As usual I will start with background and theory. Easy to want to skip that but you will spend more time regretting it than if you read and understand first time as concepts always count for more than just rote learning. Your call. If you want to skip ahead then scroll to this image:
In the beginning there was the Moog and it was (mostly) Subtractive. That means you started off with a farty sort of sound and used Filters to cut bits off to get another sound. All the sound was made by stuffing real voltages (that could zap your pinkie) down wires and through other boxes that bent the voltage. In the end you converted the voltage to a sound via a speaker. That is the simple explanation of Analog synthesis.
…and Then There Was Digital
The first fully digital synths most people were aware of were Yamaha’s DX-7 and Casio’s CZ-1000 in the mid-80’s. They were the ones that lots of people bought, but digital had been used for a decade or three already as a sound creation method. It was just crazy expensive as it needed a lot of processing power. Funny as now people want Analog and that is the expensive one. Processing power is cheap these days so really all it comes down to is the interface.
Let’s start by deciding what a digital synth is. I say that almost any synth you use in a DAW environment is actually fully digital in that there are no voltages and lots of 011100010101010 going on – nothing real exists till it pops out of your DA converter. Every action to that point is done in maths, so (in theory) perfect. Virtual Analogs generally try to be like a real Analog synth so we will pop them aside. There are synths that put aside some, or all, of the traditional Moog/Roland things and strike out in different ways. We will call them Digital Synths and have a look at them.
Here are a few of the common methods of Digital synthesis:

Phase Distortion (PD): This was almost exclusive to Casio’s CZ range of synths and a great place to start as it very simply multiplied a Sine wave with another wave to create more complex shapes like the Saw, Square and Pulse waves we were already familiar with. There was no Subtractive filter as we knew it. Every sound you heard was made from bending the initial Sine wave. This is the important bit to get. If you wanted a brighter wave you bent the Sine more. If you wanted the sound to start out bright then become more muted you changed the wave-bend amount over time. That was done with an envelope like the ADSR you are used to (but with more points). Rather than having one knob per parameter, the CZ had a lot of buttons and a little screen. You had to carry the image of what the architecture of your sound looked like in your head. This is another important point to take in.
HINT: The Casio CZ manual is still one of the best primers for synthesis today so well worth Googling.
Frequency Modulation (FM): this was Yamaha’s term for something similar to Phase Distortion. The method was a bit different but essentially one sine wave was multiplied by another to get a more complex wave. Where Casio gave you a few pre-defined paths to create a Saw, Square etc. Yamaha gave you 4-6 Operators (Sine Oscillators) and a grab bag of Topologies to describe how the Operators interacted with one another. Some Operators went straight to the output and others modified another Operator (with or without being heard). Confused. Yep. Almost everyone was. Remember how I said to learn to carry what the sound architecture looks like in your head. With enough patience it was possible to make very detailed sounds with FM synths.

Pure Additive: This is the hold grail. In theory you could analyse any sound and break it into bits and then re-create it using only lots of Sine waves. That leads to all sorts of graphs and Joy Division T-Shirts. Brain breaking stuff. Now matter of fact it is pretty simple (well to start with anyway). Take a Sine wave and play it – oooo. Now add another Sine wave playing an octave above – aaaaa. Aha! We added another thing and got a new sound = Additive. Each Sine wave is called a Partial and they create a Spectrum – drawn as per the image (right). This is essentially what Organs (Cathedral, Pump, Hammond) all did to get a variety of tones. Now most sounds don’t keep the same tone from attack to decay like Organs, they change over time like a Guitar or Piano. If we change the volume of our second Sine wave over time then we get a more varied sound – aaoo. Brilliant. Of course this is really hard to display on a computer screen, let alone on a tiny screen like on a Kawai K5 or K5000 so most people were terrified. Also the maths was relatively simple so there were lots of errors which lead to hard and metallic sounds (if you weren’t well in control) which is not what many musicians wanted to hear.
The real holy grail bit of Additive suggests that we could recreate a Mozart symphony being played in Carnegie Hall with 799 people wearing silk suits, one lady with a velvet jacket, and a cat that meows in bar 756, all with a pile of Sine waves being modulated in volume over time. It would take quite a bit of processing power but could (in theory) be done perfectly. We just need some boffin to make the “model” for it. In many ways it is best to think of all Digital instruments as being more Additive at heart than anything else as you are always building on a Sine wave. Even Filters tend to be happening in the maths realm.
Sound On Sound
Analog synths tend to have a “real”, “warm” sound and Digital synths tent to be “thin”, “glassy” and “bright”, or even “harsh”. This is down to how each system handles errors (my maths is not remotely accurate, merely illustrative):
Analog systems introduces a lot of errors into the voltage so 2+2= somewhere between 3.5 & 4.5 and any errors are rounded off by physical constraints. The errors are rounded in “real-life” ways the brain is already comfortable with from nature so we like the messy sound.
Digital systems introduce a lot fewer major errors in the main maths so 2+2=4.1. This makes the sound more accurate or “sharper” which in turn makes us perceive it as “thinner” as in fact it sounds less “real-world” with fewer errors. The other issue is that when Digital does hit errors in the bits it can’t deal with, the way it handles them naively is so unlike the way nature deals with real-world problems that we hear noise and other things that make the sound harsh.
More processing power means better error handling can be programmed in Digital systems so they sound more pleasing without sacrificing many of the upsides of detailed, hyper-real sounds. This is exactly what Virtual Analog synthesis is about. Adding bits of code that attempt to replicate the real-world type of errors and handling that Analog circuits create. Some are more successful than others.
Bring The Noise
Some developers want to make synths that step beyond the classic Mini Moog or Roland Jupiter 8 format and explore new territory. These are the real Digital synths these days. Initially these instruments look pretty daunting, especially if you haven’t got your head around a simple Analog architecture yet. Let’s look at a new instrument I have been doing Sound Design for. This one is actually an Additive Synth but there are lots of routines to define how Partial Spectrums are designed and modified in real-time:
Now if that doesn’t make you want to run screaming then maybe you don’t need to read any more. If it does then let me walk you through the main sections and how they work. This is Oberon from Zvork for the Propellerheads Reason RE format, but don’t let that put you off as if you get this then whatever Digital monster you have will make more sense. We will start at the top with those envelopes that make Pennywise look downright friendly:

Envelopes: Digital synths tend to use a lot of envelope shapes as they are a pretty easy way of visually describing mathematical transfer functions over time. Don’t be scared as you can still just work with the simple ADSR that you know and love. Upside is you can have more or less points in your curve as you need them. In time that will become obvious for you. Till then keep it simple. On the right you see an ADSR Envelope shape which is controlling the volume of the sound over time: from Note On, sound rises to full then Decays to the Sustain point (where it stays as long as note is held), then fades out on Note Off. Like I said above, if you can see this happening in your head then you are half way there already. Oberon gives you a head-start by offering some preset Envelope shapes in each of its sections.

Oscillators: Good Digital synths tend to let you make your own Wave shapes. On the right you can see a simple Square Wave. As you see the Envelope shape literally draws what the wave looks like across the travel of the Envelope. If you get a picture of a wave shape for an instrument then you can copy it here and get something that sounds kinda close. Now Oberon shows us another common thing in Digital synths, the ability to morph from one shape to another. Each OSC has two wave slots A & B. I can put a Saw in one and a Sine the other and morph from one to the other in real time. This isn’t cross-fading, remember there isn’t any sound till it is popped out of the synth, it is all real-time maths so Oberon calculates n number of points between Wave A-B. This is called Interpolation – points in-between two poles. I am guessing Oberon uses 128, 256 or 512 points as you can hear some stepping in some instances. That is a digital synth “erroring” the things it can’t handle. In this case there appear to be 256 Partials so as the engine crosses from one Partial to the next you get jumps. You can see this as a liability or character. This stepping is really only obvious with extreme setting so not an issue; I think it is character.

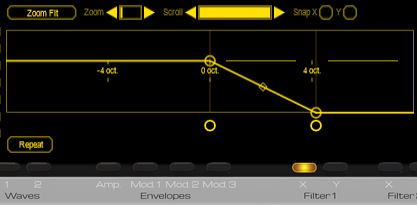
Filters: Oberon offers Filters that you can make yourself. Let that take a while to sink in. Normally you are offered a few pre-set shapes like Low Pass, Band Pass etc. Oberon can draw all of those but it can also draw any other wacky shape you want – that weird scribble you see in the main image, that could be a Filter shape! Now to make it more interesting, like with OSC, you can have two Filter shapes and morph between them. Each Filter has an X & Y shape and the X knob is like your Filter Cutoff Frequency position and the X-Y knob is the morph position from the X to Y shape. You can set up a simple 24db Resonant Low Pass by drawing a shape in the X-slot and then the same shape in the Y-slot but adding a peak in the shape at the cutoff point. As you raise the X-Y knob you hear a typical 24db Resonant Filter. Letting you design any Filtering shape you can imagine is a huge thing as it lets you play with different types of roll-off. Sure many shapes will have odd results but you can do it. Furthermore you can draw two bizarre and unrelated Filter functions and morph between them. Now of course don’t forget that there aren’t really any filters as this is just maths re-working the Partials of the final sound. This is mind boggling but learning Digital synthesis pays dividends – magical, out-of-this-world sounds.


Do It Again: Most of Oberon’s Envelopes give you the option to be put in a repeating mode. Generally an envelope is a one-shot thing, triggered by Note On, but a Repeat function allows part or all of the envelope to run again and again like an LFO. First time you use this will probably sound very un-natural or even uncomfortable but once you get used to the idea it is a great way to get interesting moving textures.

Modulation Matrix: Mod Matrix is really a Modular Analog synth thing but the digital environment lets us draw Mod Routing out far more efficiently. In a modular you would run a wire with a Voltage from one place to another. That was “patching”. Oberon uses the same method used by the almighty Thor. You choose a Source like an LFO or Mod Env and send a certain amount of that signal (up/down, wobbly) to something you want to move in time like a Filter. You can then Scale the amount of the wobbliness with another Source like a Mod Wheel. That lets you assign Vibrato to the Mod Wheel for performance and host of other cool real world or synthy things.
Say Hello, Wave Goodbye
The core audio engine of Oberon is an Additive synth. That means that for everything that you do on the front panel there is a lot of maths being done that essentially “draws” the resulting wave. You don’t really need to know how it does it at the maths level, merely be able to hold the image of the architecture and sound in your head well enough to be able to decide what you need to do to make it closer to want you hear in your imagination. Notice I keep making that point – deliberately as that is the real skill us sound designers have. Songwriters can carry chord progressions in their heads, I carry synth architecture and what a sound looks like over time in my oversize Leonine ego. My nature makes this easier for me than some other people, but it is also because I wanted to learn sound design and I have practiced for 25+ years because I still love making sounds – even if it is another brassy blart or painfully potted piano.

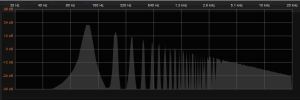
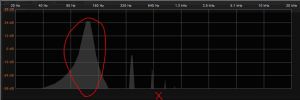
Get familiar with the concept of the Partial graph as it describes Additive synthesis in the simplest possible way. The line on the furthest left is the first Sine wave or Fundamental. The second line is the 1st Harmonic and in a Saw Wave is half the volume (which isn’t half the height of line – bloody logrhythmia). Each line after is another Harmonic and therefore another Sine wave in the pile. On the right you see a Square Wave from Oberon in a Spectrum View. You can see the separate Sine waves as points. Every second Harmonic is missing which is what the harmonic series of a Square wave looks like (well it should be but remember those errors). You will also see “waterfall” style displays which show more info over time but while they look prettier they will do your head in. If you can carry just the first and last points in your head then that is enough. Here is a Saw and a Sine. Imagine that sound starting as a Saw and fading to a Sine. This is what you need to see in your head – lots of Partials fading to one (well again there are always errors):

I have covered the common synth functions so far but Oberon has a few of its own (as every adventurous Digital synth does), I’ll try to put them into perspective for you:
- Start & Motion: Start is the Morph position knob between the Oscillator A-B waves. But it doesn’t behave as a straight A-B. It really works as A-B-A. I think this is to match up with both uni-polar and bi-polar modulation sources like Env or LFO. Motion is how you can define movement of the wave Morph position. You can use use this knob with its pre-defined functions or DIY in the Mod Matrix.
- Bend: This is kinda an odd one initially but makes perfect sense if you have played Guitar, Harpsichord or Clavinet where the string is bent in being played. Remember how Additive is all about adding more color to the sound – this knob acts somewhat like what happens when you bend a string. As you bend the string, the pitch rises and the sound gains more harmonics. On its own this knob will detune some or all of the partials in your sound (there will be a solution later) whilst making it brighter and more complex. In action the level of some of the higher Partials are raised (more on this later too). In practice I found a bit of modulation of this introduces a bit of Unison style detune. With higher settings it is getting pretty clangorous and off-pitch. You can create an Envelope curve specially for the Bend function to tell Oberon how you want the Partials changed across the spectrum as you raise the Bend amount. This is a lot like the Filter X-Y – the height of the Curve defines how the pitch of the Partials in that part of the Spectrum are affected. As you move to the right you are working with the higher Harmonics/Partials of the wave shape. This can do some pretty out-there things with your tone.
- P Clip: stand for Partial Clip. By “clip” it means that it simply adds equally to volume of all Partials. If the Fundamental is at 127 (full volume) then there won’t be any change which is where it clips. Every other Partial will rise by 1 (with a max value of 127). Raising this knob will make the wave sound progressively brighter as the higher harmonics become stronger. Ultimately at 100% all Partials will be at full volume so the spectrum, instead of looking like a ramp (Saw above), would look rectangular like a semi-trailer profile and be completely flat from low to high which is some scary kind of Pulse wave with a harsh metallic sound.
-

Oberton Architecture XMorph: Digital synth makers love the idea of multiplying and morphing things with copies of each other. It is just another bit of maths after all. This feature initially will simply morph from Osc 1 (pair) to Osc 2 (pair). Think of that as being a bit like the Prophet V vector thing. However, it can be more interesting as you can Transpose the other Osc copy so as you morph from one to another you get some messed-up sounds. You can also have the XMorph morph the Osc to itself (Osc 2 button). Initially this does nothing as the two poles are the same but if you Transpose the copy you get more messed-up action. The Limit knob lets you control how much of the Partial Spectrum is affected by the morph. At 100% it is all-in. At 50% only you are half way between the two poles. This works best when Osc 1 & 2 are running different waves. The XMorph Curve then lets you define what parts of the Partial Spectrum are affected by the morph. You can make it so everything is equally affected or just some of the Partials in the middle of the spectrum. Again pretty otherworldly.
- Harmonize: This is what I promised you earlier. A lot of these math routines will leave your signal with some pretty ghastly tuning issues as partials get dragged around. This knob lets you force the Partials back into tune. It will have the effect of changing the tone you hear as it pulls the Partials back into perfect harmonic proportion. Now even the most perfectly tuned concert grand will have some in-harmonic Partials. You can choose how they are allowed by either not turning the Harmonize knob all the way up or you can Lower the Limit knob. Odds are if your sound has some interesting harmonics they are in the upper part of the spectrum. The Limit knob at 50% will tune the lower Partials and leave the upper alone. There is also an Octave switch that lets you offset the harmonization pitching to one or two Octaves below. This will alter the timbre and even act like a Sub Osc as you now have more action in the lower half of the spectrum.

By now your head probably wants to explode. That is normal. There is a huge amount to take in here. If you use Reason then press F2 and watch all this happen in real time in the Spectrum Analyzer. Use just one Osc and deliberately watch what happens as you use each function one by one till it makes sense. Really you are just using knobs to apply pre-defined math routines to change the level of partials in the harmonic spectrum. The more you watch and understand how the knobs correlate to timbrel outcomes you hear, the more it will make sense.
If you were really good you could do all of this with a big bank of Sine Oscillators and Envelopes. Sadly it would be so scary 10 units would be sold and only 1 would ever be used for anything remotely complex -and that record would be too obscure for all but 12 fans (9 of whom have mental health issues) LOL.
What makes modern Digital synths interesting is, while each instrument is working with the same basic principals, it is how each defines their maths and interfaces that one instrument can shine a bit more in a certain area or simply make more sense to you.
Here is a piece of music called “Goldrush Travelers” from my latest album called “Sea Changes” written using only Oberon sounds (except for drums):

Ahoy there Benedict . . . I enjoyed reading the last three blogs . . . thanks not only for the content . . . some of which is well beyond my experience . . . but more for the manner of writing . . . your turn of anecdotal phrase keeps me reading.
Then I listened to Sea Changes . . . my fav is actually Funk – a – Sea . . . I am a sailor busker surfer type who lives on a boat and plays real instruments . . . some are made from junk . . . others rescued from the dump & repaired . . . this is how I make my living . . . I too make records ie music for sale on CDs . . . my point is that through your efforts you have encouraged me to think more deeply about music & enjoy audio beyond my ” preferred comfort zone ” .
Coincidentally although I have never been a great fan of Neil Young . . I just finished reading his autobiography which details in a weirdly cohesive way concepts of life in general . . . and how music is created, performed & distributed.
Your own spectrum & this blog has resulted in listening pleasure & better understanding for me !
Cheers & respect from Pete aka CaptainTricko
Thanks Cap’n
Well we share that we build our own instruments. Ok so mine aren’t physical but I still build the sounds as/before I sequence them. If you want to work in some of the evil synths then I am up for a chat.
I have probably read the same Neil Young Bio. Was pretty good. I mostly wanted to know about “Trans” but it was a good book overall.
🙂