It has been a while since I did one of these and with my newfound ability to make talkies (with poor audio balance I admit) I figured I might show off – sorry I mean “show you” – the hows and whys of my new Acoustic Guitar patch made using Grain from the new Reason 10.
Here is the video where you get talk & playing (if you can call it that). It is 36 mins so far from tight and concise, but I do explain quite a bit so if you really care to expand yourself as a sound designer it might be worth the time.
Here Is The News

For those of you who like to read here is an overview of what is in the video.
I was in the middle of a patch making session focusing on using a set of samples I have been using to make a ReFill for NN-XT but now Grain is amongst us it seems silly not to make use of those samples in the new toy.
I had been swapping samples in and out of Grain and making patches based on evolution of parameters and had dug in with a Piano sound that I also heard a space drum in with a flick of the Pitch Jitter knob. I swapped to the next sample and heard a plucked sound. Not surprising seeing Pianos & Guitars aren’t too far apart (considering Clavichords & Harpsichords in-between).
This is part of being a sound designer, like a sculptor you hear the sound in the rough block you have before you and then add and subtract elements to get closer to releasing it fully.
I am a synthesist at heart so ultimately I am not looking to make the exact sound but a version of it, like an Impressionistic painting. The human mind being what it is you can use pointers and people will think they are hearing something familiar.
Color By Numbers
- With a Sample loaded, I had the Grain Oscillator module active. This works best using the Freeze play mode for the Sample. This is a great way to pull out passing timbres within a larger sample.
- The Sample Position is set to randomly play a little around the main marker so every note is slightly different. I don’t let this get too wide or notes seem too random instead of similar but interesting.
- Both Jitters are off because I want a really clean sound. Acoustic Guitars are known for their perception of purity and their ability to impart that feeling in a piece or mix. Adding noise is not what we want here.
- I adjusted Grain Length and Spacing to suit the sound I heard.
- Amplitude Envelope has a big impact on how we perceive a sound. A guitar has a shart start and fairly swift decay with no Sustain. Getting this right will help a lot with believability. Get the envelope too long and it sounds synthy, get it too short and it becomes a dulcimer. Also, set Release to pretty short to assume each note played is muted when its official duration is over (we’ll come back to this). I set Velocity to shorten attack as softer notes do have noticeably less transient.
- The Formant has a large impact on the perceived overall timbre of the instrument. Here that is the interaction between the string and the body (soundbox) of the guitar.
- I also adjusted the Key Follow for the Formant as the guitar’s box has its limits so will behave differently with each string an9d string length, i.e. fretting. A synth will tend to have all formants perfectly lined up for every key but the physical limits of the body mean there are sweet spots in the middle but tracking is less pronounced at the limits (top and bottom) of the playability. having a sense of the target instrument’s sound helps here. If in doubt go to YouTube and find videos that cover the situations you want to emulate. If possible watch what is physically happening. If you have ever spent time with any acoustic instrument his will help greatly.
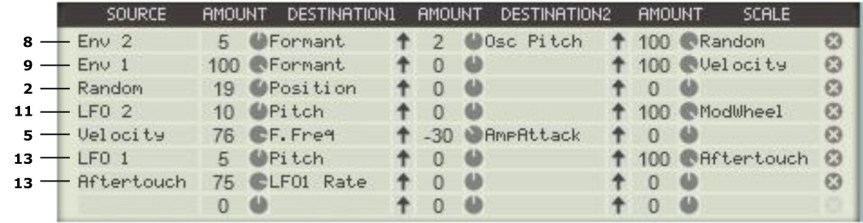
- In the Modulation Matrix, I have added a few entries. The first is to have Envelope 2 move the Formant & Pitch of the string with a shift at the note on as when playing a string, the string is stretched so tone & pitch are deformed upwards over a fraction of a second then fall fairly fast as the string settles into its normal vibrating range. I chose to give this a Random scaling but you could equally use something like Velocity.
- Because Guitars (like Pianos) use an attacking force to get them moving I needed to create that transient. In a multi-OSC synth, I would normally use a second OSC for the pluck or thump but I don’t really have one so why not use the Formant more dramatically as that is what is really happening. I assigned Env 1 with a very sharp & fast spike to have the sound start with the formant peaking high. This I scaled with Velocity as clearly the harder the string is plucked the brighter it will be, whereas a thumb rolling off a string will be very soft and muted in the attack.
- We now have a pretty guitary sound but it is a bit flat and synthy. We need to liven it up with some performance characteristics because real instruments tend to be warped as we play them in many ways. What you choose and how you implement is to some extent up to you and the limits of your controller & synth architecture but again think of the instrument and how it works as your guide.
- LFO 2 is assigned to Pitch for a Vibrato and scaled with the Mod Wheel. A guitarist rarely lets a string ring out completely clean because the sound gets “thin” & “flat”. These are partly physical and partly psychoacoustics. Once the string has settled into its “normal” vibration phase it becomes less interesting as pitch and tone are pretty stable. the excitement of the attack is gone so we tend to start to ignore the sound. Making it bend or wobble again revives interest and the perception of “bigness” of the sound. LFO 2 is set to allow the vibrato to fade on over time as a guitarist rarely applies vibrato as the note is plucked. Again program to taste. I like to offer a bit more depth than is normal so the player can choose how much they apply in the performance. If there isn’t the option to get a bit excitable then the player may get frustrated.
- Guitarists Bend strings, that is push and pull them to alter the tuning of a particular note. Hard to do with most synths unless you have a polyphonic aftertouch synth & keyboard (not a Reason feature) but you can point to it with controllers. Here I left that to the Pitch Bend Wheel. Equally, that could be assigned to Aftertouch, Expression or any other pedal.
- I did, however, make a second Vibrato option using Aftertouch where LFO 1 is sent to Pitch and scaled buy Aftertouch. Aftertouch also raises the Rate of LFO 1 to mimic the way a guitarist will apply vibrato, hand wobbling. to the string. This can be used in conjunction with or as an either/or with the LFO 2/Mod Wheel option above in a performance.
- The last performance consideration is how notes ring out. When setting the Amp Env we set Release to short to emulate each note being muted by the player. In a performance, notes are often left to ring out as part of the phrasing. Synths have the option to do this using the Sustain feature. If you don’t have a pedal you can simply Automate this by hand. If so then generally sustain through the phrase then close and re-open for the next phrase to let each phrase breathe.
- Grain has a suite of effects but Acoustic Guitar is often best pretty clean. I added a bit of Reverb but while Grain’s effects are nice, there are units far better suited to the clean guitar sound like RV-7000. The onboard fx are far more synthy so undo a lot of what I have done. I explain each effect module towards the end of the video if you want to see & hear them.
The patch will go in my next paid ReFill so please don’t ask for it here.
But always happy to answer any questions you may have about sound design.
