Mastering is always a hot topic in the Forums. Everyone is struggling at the last gate to make their piece meaty, beaty, big and bouncy. Most people come at it straight on, whack a Limiter on the end and proceed to turn it up past 11. It doesn’t work out.
You know me, I like to attack things sideways. Everything has a ‘trick’ to it and that will never been seen head on. Head on is where the illusion, and therefore confusion, rules. Music is about making illusion so come at it sideways before you fall (too far) for your own illusions.
There will be a bit of reading and theory here so if you don’t want to partake feel free to bail now.
Step 1 – The Reason
What is the purpose of your piece? When asked this many musicians slink away. They don’t have (or know) the reason for their song. This is scary. I sure wouldn’t want to be standing in front of that train (wreck). Make sure you know the reason for your piece: it may be a soppy ballad, it may be about your dog Mandy, it may be about how you hate your ex or it may simply be because you wanna make the kids bounce. Whatever it is be sure you stick to that vision and keep it pure.
These days I don’t even like the term Mastering. I prefer Finalizing. You are finalizing the image you have created. This term has a sense of ‘overview’ to it as opposed to the sense of ‘jamming into a box’.
Digression #1 – down with the drums
My last record I had someone tell me I had to fix the mix as the drums were too quiet. By golly he was right, if I turned the volume way down they disappeared! All I could hear was the melody. I freaked a bit and contacted a pro who very nicely said that while indeed my drums could be louder their role was showing the passage of time (or something similar) so the mix I had showed my vision well. And that it did as I had turned drums down as they were overwhelming the melodies which were the reason for the piece. It was Progressive Space Music and not Dancefloor filler. Low volume was likely in a listener so if anything was to fall below threshold then it should be the incidentals and not the reason.
Step 2 – The Mix
The Mix must sound great before you even think about finishing it up for the CD/mp3 making man to do his thing. Mastering WILL NOT ever, not ever, never, fix a poor mix. This is a myth, made to support the sense that mastering is a black art. A mix can be adjusted some and a record or three were helped by the mastering engineer but relying on that bloke, or more likely lately a plug-in, is making a mighty mistake.
We’ll assume we have a good performance. If not we shouldn’t be here at all. Never be afraid to acknowledge that this isn’t a good piece, that your song hasn’t made the grade. You can throw it away, save it for another go next time, or even let it go as a B-Side.
The Mix is where the real magic happens, bit by bit to make that whole out of the rough material. Most of us are working on our mix as we track, record, or just mouse our song into existence. This changes the flow from the tradition where the guy who is goin’ to make the mix done comed in after the pickin’ been done. No matter, the result is the same: understand the reason for the song and get all the parts to support and push that story along.
Digression #2 – mixing into a compressor
There is debate about whether to mix into a Compressor or Limiter. I will admit to having a Brickwall Limiter across the Master Outs but I do not mix into it. It is there so I don’t send stray peaks on down into my speakers. If I ever look up and realize that there is compression action happening before I get to the Finalizing stage I tidy up my mix. If I have a sound I like (as a result of that squishing) then I copy those settings into limiters etc. at the instrument/bus level. It works out way better that way or I can promise that the mix will go downhill from there as you perfect your mud pie.
Step 3 – The Finalizing
Most of us will use some sort of chain of processors. There is debate about order which I won’t cover here. I will show you what I currently use and this is basically what I have used for my albums for at least the last 12 records. I use Reason and handle everything “in the box” very happily. You can use whatever you want but the theory and reasons for why you do what you do should never be different.
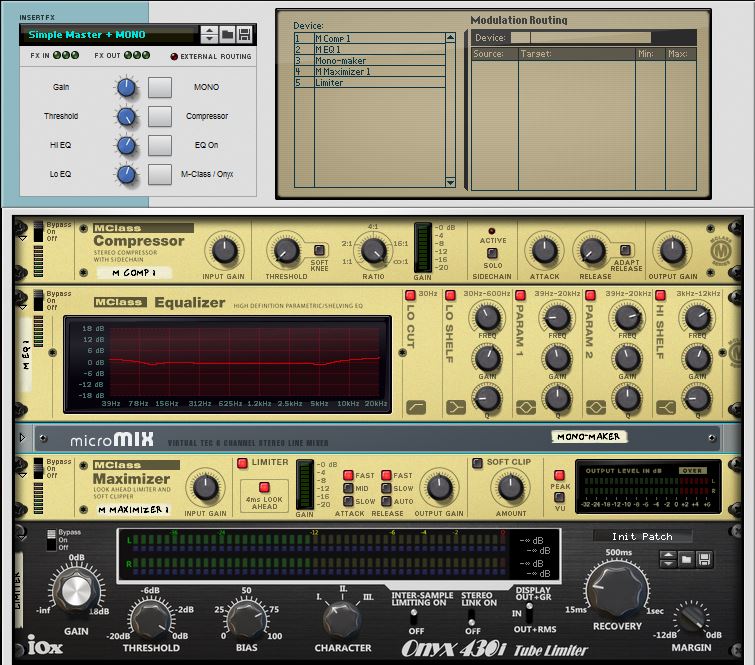
My Chain is: Compressor > EQ > Mono (and Gain) > Limiter. That is it. You will see up top I have the main buttons and controls mapped to the Combinator. You will also see that in default (mixing) state everything is OFF. There is not action in this section till I am happy that the mix is as good as it gets (see Digression #2 above). Each unit should add a little something extra to the mix.
#1 – Compressor

At this stage Compression is not about controlling levels. It is here to shape the groove of your piece – to glue it together. The human ear/brain has its own compression tricks and if we mimic them along with the groove of the piece then we are winning.
I didn’t used to to use compression at all. I didn’t really get it till I read Stav’s “Mixing With Your Mind”. The way he explains how to set up a Compressor is worth the price of the whole book alone. I can finally use compressors and add value.
I turn on my Compressor and that meter is pinned which lets me find the shape and groove with Attack, Release, Ratio and Threshold – in that order. I will generally loop the main punchy part of the piece and tune the groove there, then check the other sections.
In the mix I may well use quite a lot of gain reduction action, with a slow attack it can be wonderful, but at the master, I feel that if I need more than a flicker or two I have gotten something wrong. Remember always that a compressor is turning the volume down, never up. It is the limiter that lets you turn the volume up.
#2 – EQ

Like compression, Equalization at this stage is about the overall tone of the piece. Final EQ should make a mix sparkle and sound like a place you want to be. Generally all you will need is a db or so top and bottom.
This is not like taking your home stereo and winding Bass & Treble knobs to max. If you find yourself EQing to bring out a specific instrument (like the kick drum) then you are making a mistake so go back to the mix. When you are “in the box” this is easy as the mix is right there and you know exactly what you are looking to do.
Digression #3 – the “Pultec Trick”
The “Pultec Trick” is a clever way of adding more boost without creating ugly peaks. Simply put it is made from adding same amounts of boost and cut at the same frequency to create a shape like above where there is a dip in the middle of the boost. I think it works because the human brain isn’t linear so things that wander a bit excite us. Who cares, if you get it right it wails.
#3 – Mono & Gain

I really covered this in another article on the importance of mixing in Mono. This little mixer in the middle of my chain serves two purposes: 1) allows me to switch to a single speaker Mono mix, 2) handles overall Gain.
This happens post Compression and EQ but pre-Limiter as I don’t want to mess with the Compressor’s groove, or the EQ but as I drive two Limiters I want to be sure the Gain is equal. Tempting to trust that both deliver +3db when they say they do but I’m not going to fall for that 😉 I’ll handle the gain/drive of my Limiters equally thanks.
Also if I do find I’m driving my whole mix a bit hot, and the safety-Limiter is flashing, then I can use that gain to un-wind things a bit.
#4 – Limiter

Now you may notice that I have two Limiters in there. No I ain’t cascading them but working an either/or. I just recently got that Onyx RE and I want to be sure I am using the right tool for the job. Mostly I use the M-Class to catch stray peaks at the sound creation & mix stage and then right at the last switch over to the Onyx as it has a way to sparkle up that mix real nice which leaves the M-Class sounding mushy by comparison.
Each mastering unit will come with its own versions of the basics: Input Level, Attack & Release Speed + pre-Look, Clipping, and Output Level.
Input: As said above I drive the Gain of my Limiters from the Mixer but if you don’t use that step then you will drive from the Input Gain. I drive till the loudest parts give only about 2-4 db of reduction. You may choose to go harder. Tempting to hammer that unit till the speaker cones are out there past your ears but this isn’t a good call as the flatter your dynamics the less like music your piece becomes. No exceptions to that law of nature as loud and soft are essential parts of the way we recognize, interpret and enjoy sound.
Time: Generally you will want your limiter to catch peaks as fast as possible. There are situations where you want otherwise and they come as you better understand that sense of groove discussed in the Compression section above. Till you know why then leave any Attack setting at Fast.
Because Limiters work on the signal as it comes through they can be too slow to the party to catch every stray peak. Software allows the limiter to “look ahead” a few milliseconds by delaying the output by that amount. It’s a trick but a great one as it lets you use slower curves without fear of losing control. Inter-Sample Limiting is really just a fancy way of saying the same thing. Set to ON.
Release is really exactly the same as on the Compressor above. It sets the time in which the limiter lets the volume recover to full after a signal has tripped the threshold and gotten turned down. It is a balancing act, too fast and the signal will distort as you pull it around too fast, too slow and the piece will audibly pump and lose presence.
Clipping: A Brickwall Limiter has a fixed Ratio which is effectively Infinity:1. A compressor working at 4:1 will output 1 extra db for every 4db thrown at it. If you toss 40,000db at a Brickwall then it shouldn’t output a single extra db. Powerful stuff. The trade-off is distortion as that signal has to be warped to ram it down. It is in the warping process that a limiter gets its “sound”: Soft Clipping, Tube Drive, Tape Drive… it’s all the same, Distortion. Initially beautiful then suddenly horrifying.
Output: while the aim is to get as much volume as you can, digital is a an unforgiving mistress so it is generally good practice to allow a little bit of space between the top of your mix and the top of the tin: 0.3db is a common allowance.
– – –
Remember that processors are not neutral, especially the exciting ones like that black beauty. A little is lots. More quickly becomes less as you stretch your mix into ugly-town – I’m a thinkin’ of one of those people with too much plastic surgery, you know what I mean.
If I find that any of the units above isn’t adding anything of value then I pop it to Bypass. No need to use it for the sake of it.
