
Many people will wonder why anyone would want to record a record (remember those vinyl discs) into the digital domain. Well let me tell you there are a few reasons. Firstly a record in good condition has a lovely sound and it definitely ain’t the same as a CD. Sure the CD may have a better frequency range and clarity and some other technical stuff but vinyl can sound great.
Also records are the true sound of the era. When I first got my Best of Bob Seger CD I almost threw it away, all that treble and brightness and clarity. It wasn’t how the music sounded. Don’t worry I got over it but records do sound warm and punch in a way CD just doesn’t. Also there is material that you just can’t get on CD or any other digital format. So we record our vinyl to allow ourselves to carry our valued collection in our pockets and cars (something records never managed).
In this article I will detail the process I use as it will be of great benefit to others who follow. I will dispel some myths too so if you plan to transfer then read on (and on – yep I know me).
Hardware
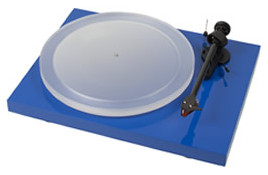
Firstly you will need a record player. Please don’t assume a $49 transfer-your-vinyl-to-mp3 plastic player is going to do anything good for you. It will just sound nasty and the cheapo stylus may even damage your records. Anything that has DJ stylings is likely a bad idea too. Get a decent turntable. If on a budget I can recommend the Pro-Ject Essentials range as they are about the same price as a plastic jobby from a chain store and will sound much better. If you absolutely can’t afford that much then grit your teeth and find something second-hand. Look for audiophile gear that is being cleared for something newer. Then buy a new cartridge/needle set-up from someone like Ortofon (again not the DJ stuff). A decent new cartridge will perk up any old deck and get your record sounding as good as it can. An old, crap, or even broken cartridge will sound dull and distorted.
Once you get your spiral scratch spinning you need to get the audio to your PC. You need a decent pre-amplifier to get a Phone Output up to Line Level. A good quality older stereo amp will do this or get a wee box when you buy your turntable. Most quality brands will offer such a thing. Yup, the warning: don’t buy something for $29 from Radio Shack.
Soundcard. Please don’t assume the Realtek in your PC is particularly good. Sure it sounds ok for casual listening and splattering aliens but the noise-floor for recording is normally dire on these things. Get a semi-pro card or USB interface from a music store from a brand like M-Audio. If you can go PCI Slot then M-Audio‘s Audiophile 2496 is a joy and cheap as chips. The 24 Bit thing does help some but not enough to get anal over. I currently have a Yamaha Audiogram 6.
You may encounter suggestions you can record your records at a higher speed and then pitch shift it back to normal to save time. Poppycock & balderdash. Don’t be fooled by your own greed to save time. Records and digital recording are made to sound right for the speed they are pressed at. Wrong speed playing will damage the sound at the needle, and at the software. You may even damage records. Simply put everything is as it is for a very good reason and if you try to get clever it will be your undoing when your recordings sound like rubbish.
Software
You will need some recording software. Many will tell you something freeware like Audacity. I don’t like it as I find it cumbersome. A more polished app is Sound Forge. However what I would recommend is music recording software as it has certain advantages on the cut-up. You could get Reaper or another DAW like MuLab but I find most of them cluttered and over complex. Here I am lucky and already use Propellerheads Reason for making music so I use that and will show you my process in that. If you look carefully at the Audio Interface you purchase, you may manage to get Reason Essentials bundled and that would be a good win as it will do everything you need in style.
Either way avoid promises of one-button record-to-CD type stuff. By hand is the best way and what a real transfer engineer would do.

I will now assume you have all your gear set-up and rigged right so your records are appearing and recording into your software nicely. I will assume you have a decent listening set up and environment too. I will also assume you have cleaned your record and stylus well. If you haven’t played this record for a while then be prepared to record it twice as first time the record may well be dusty. Second pass will be better I promise. If not I will offer a possible solution later.
Levels In

Half the battle with recording is in the levels. You want it to be loud but not so loud that it Clips (distorts). Clipping in digital is the end. Pop a clipped recording in the bin as the effort to recover it is way more than the time to re-record. After all Frank ain’t going nowhere once he’s been jammed into that groove. Allow Headroom in your recording so that the inevitable pops and crackles don’t put you into clip.
Record your record in full, don’t break for songs, flip the record, clean the vinyl and needle and keep going all in the one take. Your computer and hard drive won’t explode with a few extra moments of silence.
Covers & Folders
Whilst your record is recording prepare your cover/s. Unless you want to go the trouble of scanning all your own record covers (and it’s not worth it) then you will find images on the net using Google Image search. Think ahead a bit to where your music will be used and any file size constraints you may face. For a Phone use a smaller image. If you are going to a Terrabyte HDD then a larger image size will be nicer over time. Either way decide on a size and stick with that.
Create a Folder structure that will stand the test of time. Stick with the basics. I have a Master folder, in that there are folders for each Artist and inside each of these the Albums. Looks like:

Music Collection
— Adam Ant
— Bruce Springsteen
— Corey Heart
— Duran Duran
—- Arena
—- Duran Duran
—- Rio
Levels Out
Now you have the record recorded as one take you need to set the overall level for the record. I use the Mastering Limiter that comes with my software. Just about everything will have one. If you need to find your own then use the simplest options only.This Limiter (Brick Wall) is there simply to make sure nothing clips, especially with the pops and crackles. I dip through the loudest cuts on the record (usually the first song) and check that the Gain Reduction meter is not showing more than the merest flicker on the loudest parts. Any more and it may sound grand but you are destroying dynamics and the record will start to sound annoying when you listen later.

Improving the sound
Don’t! Yep you read right, do not do this unless you happen to be a transfer engineer or Bob Clearmountain. And I know you aren’t because you have read this far. Be humble and know that you don’t know what you are doing and trust that the engineers who went before you did it right. You could get clever and tweak a bit here and there but odds-on what seems great now will sound like garbage in your car in a week’s time. Almost anything you do (including one-button record cleaners) will do more damage than good. Once you get the levels right you have had the biggest win you are going to have. Trust me as I am a musician/engineer so I have some of the skills to re-master and know my limits.
Cutting Up
Now you have an album that sounds good in-Toto (te hee) but you will want to cut the tracks up into individual songs/files. With most records this is really easy as there is a clear defined start and finish to each track. Sometimes it is a bit more challenging. You must use your judgement but again, think long term as what seems clever today will probably be annoying tomorrow. If there is no good solution then admit defeat and accept that this record will come in one or two slabs.
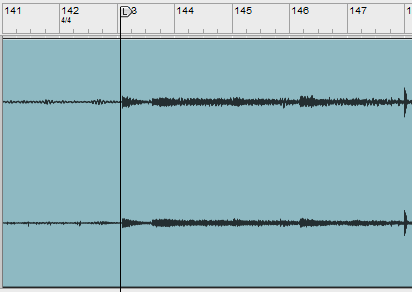
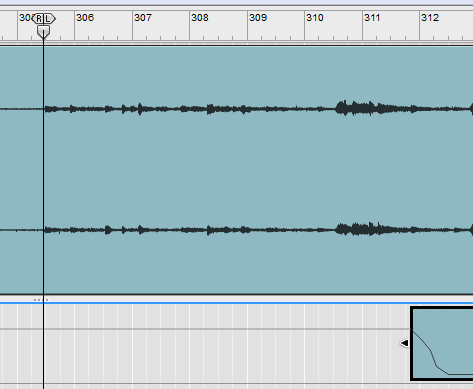
Use an Edit or Zoom screen to get in pretty tight to the waveform. Don’t fuss about sample-level, but close enough to be able to get the cuts where you need them. Think musically useful. Use the Left & Right Indicators to define start and end points.
Start with the start of the first track. Put the L Indicator to just before the first hit or just before the fade-up starts. Make sure you don’t go so close you are chopping off transients. Check this by putting the Play Cursor exactly on the L Indicator and hitting Play. If it sounds exactly the same as if you roll from before the L Indicator then you are right. If the transient sounds “soft” then you have chopped a bit off. Try again, zoom in more if necessary. Let your ears be your guide.
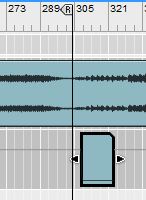
Now we need to define the end of the track. Using an overview, position your R Indicator at the start of track 2. Now go back to the zoomed view and use the technique you just did to set the R Indicator to the start of track 2. This is your track defined.
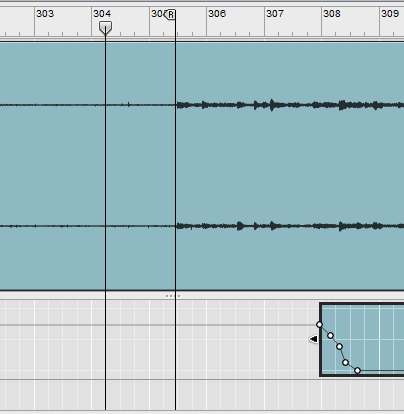
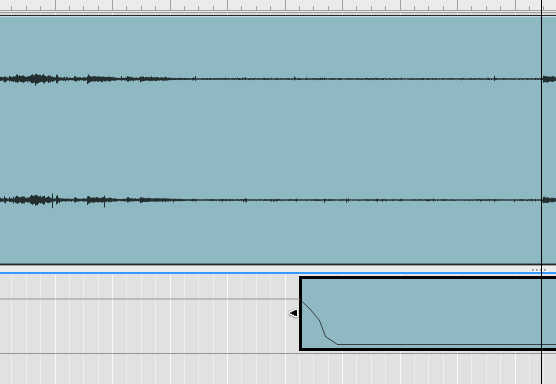
Leave the gap between track 1 & 2 as this is part of the album sequencing. If you like you can set a fade over the silence between tracks. Most software tracks allow the creation of envelopes. In Reason the envelopes are on a separate track which is great as I have defined a normal fade a fast fade and even a short fade-in. These I leave muted till I need one. I use the normal fade on most tracks by sliding it till after the last of a track has faded into the hiss, pop and platter-noise so there is some silence between tracks. If in doubt, don’t fade as pops aren’t the annoyance you think they will be. Also be sure you don’t use fades that chop some of the music off as they will feel wrong later. Having a volume control handy (and a patient wife) will help make sure you get your fade positioning right.
Exporting Songs
Now you have a track defined, you need to export it to an individual file. Most systems will let you Export a region (defined by the L & R Indicators). Export this to a Wave File at 16 Bits and 44.1kHz which is CD bit depth. If there is a Dither option, check that.
Now you turn to track 2. The start is point is already defined by the R Indicator. Snap the L Indicator to the same position (most apps will do this automatically when you get close) and then pop the Play Cursor there too. Move any envelopes to the right and press Play (after turning the volume down). Swap back to the overview and drag the Fade Envelope to just after the start of track 3. Also put the R Indicator just before the start of track 3. Switch back to zoomed/Edit view, stir and repeat…
For the last track of and album I make sure to leave 5 seconds after the final fadeout as otherwise when you have several albums in a playlist they will appear to crash into one another when Van Halen appears to step on the lingering vibe of Cliff Richard.
I export my Wave files into the root folder so they don’t get jumbled up with the mp3 files later. Decide if you want to keep Wave files in another collection (needs a big drive) of if they will be jettisoned after encoding.
Converting to MP3
Some software will let you export directly to an MP3. If this is not the case with the software you use (Reason) or the mp3 quality is poor (don’t assume) then you will need to use a dedicated Audio File Converter application. I use FreeRIP and am very happy.
There are a few formats to choose from and each has strengths and weaknesses. If you want best quality and file size isn’t an issue then simply stay with your Wave file. If quality is paramount but space is a bit of an issue then consider FLAC (it can be a bitch to encode and keep compatible). Be aware though that many media players won’t play Wave or FLAC files. If space is an issue then the other options are OGG and MP3. OGG is not a commonly supported format in hardware players but MP3 is everywhere.
Next comes the balancing act of a lossy format like MP3. Simply put, the larger the file size the less quality you lose. Up at 320 kbit/s you’ll be flat out hearing any loss but your phone will explode if you have much of a collection. Down at 128 kbit/s you will hear your music has been put in a washing machine (admittedly on silk). Add a few kbit/s to 196 and allow Variable Bit Rate and the balance becomes fine for general listening on a decent system. Remember you still have your vinyl or CD for serious listening.
I encode my MP3 files straight to the destination folder where there should already be a cover JPEG.
Tagging
MP3 has an extensive Tagging system that lets you add Title, Artist, Album, Date, Cover and lots of other stuff. Use this as it will make life much nicer. Many players let you do some tagging but by far the best is Media Monkey. This thing plays almost anything and tags with style. I drag the MP3 files from the folder (which popped up when FreeRIP finished) into the Media Monkey Playlist and hit play. If you have music then you are winning. I take two passes at tagging.
1) Using the Tag By Filename (Select All tracks & Right Click) I set up Track Names and Numbers automatically. Magic.
2) Then I go to Properties and handle the global tags of Artist, Album, Genre, Date and Cover-Art. Save and you are done.
Just check that all track names are spelled correctly and add any characters like (/) that Windows doesn’t like. This album is now done and ready to transfer to your player.
Final notes
Backup is important. If your main PC HDD decides to leave this universe you will want to have a backup. Get a Terrabyte drive for a few coins. Or at least get a big, bouncy Flash drive thingee. Transfer your files quickly to your media device/phone etc as this is another backup.
Sometimes your much loved record is so dirty or chewed up it is never going to play well. What do you do? Buy another copy springs to mind. Or as a method of very last resort you could record the record streaming from somewhere like Spotify. This is not a license to steal as you should already own a legit copy of this record. Bear in mind though that this recording is probably going to sound really flat as the Spotify stream comes in mid-quality Ogg format, you record to Wave and then encode to MP3 so lots is lost twice! In the case of a Bucks Fizz record this was a good solution but for Single Gun Theory the Spotify stream was a bit grey already.
First few times you do this it will seem to take forever for a record. Once you are comfortable and acknowledge that it is a production-line then you can turn around a record in about an hour – 45 mins of recording and 15 mins of cutting and tagging.
I hope this helps you.
🙂
