This article flows from a request I got from Ben after hearing my “One For All” track on Pixel Deep Plays where all sounds in the track (incl. drums) were made from one short sample. Ben asked:
Really enjoying reading your posts. I listened to your album and I liked the idea of making a composition made totally using one particular synth. The track I found really interesting was One for All. I’m curious as to how you went about developing all the different sounds from the one original sound. If possible, could you make a tutorial about the processes involved in rendering pads, drum hits and basses all from one sound please.
Initially, I was thrown on how to do that. After all, I just do it. I have been making synth sounds from limited sample sets for about 25 years so that it is second nature to me; and therefore appears obvious (and yet a very large subject). Once I had tried to think about what Ben is really asking I think I found out how to answer.
Enter The Ninja
As I pointed out in the article on learning to see what you want to do, synthesis is a result of learning and knowing. One thing I learned early on was the basic “shape” of the main categories of sound (thanks Casio CZ manual). The Envelope shapes and Filter positions vary a bit but the general idea is similar enough from one example of a type of sound to another to lay out general rules.
The first thing to do is let go of the assumption that you need a drum sample to make a drum, a piano sample to make a piano, a human bean to make a voice… Sounds obvious but I see many people never get outside of this box. If you want to be a synthesist (and real electronic musician) then develop the feeling that any sound can be sculpted into something else.

This method will generally work best if you start with a source sound with plenty of harmonics: Saws, Squares, Pulses, strange mutated Rhomboid-Pulsetrains work. Sines, Triangles and Noise are less versatile if you want to use the same sample for everything. I am assuming one sample rooted on Mid C and transposed across the whole key range (yes even if it gets ugly above C5).
I use the NN-XT in Reason but you can use any reasonably well-featured sample player you like. Avoid sample players that don’t have a proper synth architecture (like drum triggers) as you can’t do enough to the oscillator sound.
Stages rearranging love
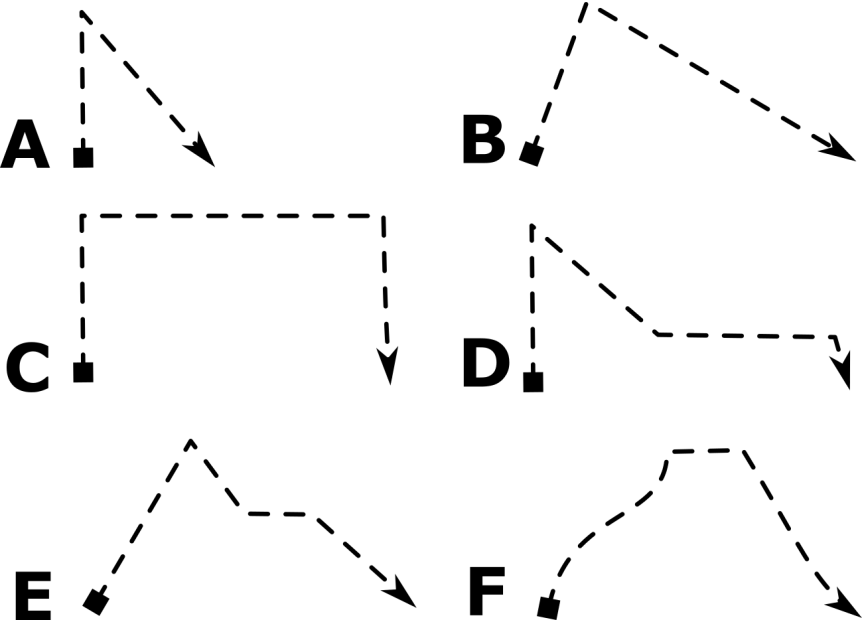
When making sound sets I work to some basic categories: Bass, Piano, Brass, Bells, Organ, Strings, Pads, Voices, Drums, Polysynths, Sequences and Sound Effects. The later categories I won’t cover as they are really subsets of the earlier shapes. Here are the basic Envelope shapes you will need to understand:
Bass
The role of Bass instruments is to reinforce both the rhythm and fundamental of the melodic & chordal structure of the piece.
Tuning – commonly tuned one octave below the main chordal/melodic structure of the piece. Some tune basses so low the first octave of keys sound all broken up. I don’t like this as it makes it harder to audition patches, esp if trying the unexpected by playing patches out of category.
Amplitude – generally a quick attack to emphasize the rhythm. Some basses will have a short decay and no sustain, others will sustain. Most will have a short release. This depends on the needs of the piece. Shapes A & D are most common.
Filter – low start position to emphasize the lower harmonics (the bassiness) but commonly with a positive Envelope in the A & D shapes. Resonance to taste but be aware some filter types sap bass power as they increase resonance. Not a fault, just a design.
LFOs – traditionally very little use of vibrato, tremolo or filter movement past the envelopes.
*Wobble Basses commonly don’t adhere to these rules so treat them like Polysynths.
Pianos
Piano sounds are very broad and cover everything from concert grands to electric pianos, clavinets and harpsichords. Mostly used to carry the chords and or melodic progression. Can also be used for basslines and effects. Commonly piano and bass sounds can be very similar in synthesis so don’t be surprised if one leads to the other.
Tuning – best tuned to middle C. Toy and music box pianos are commonly one to two octaves higher.
Amplitude – generally a quick attack to emphasize the rhythm. Most pianos will have little to no sustain and a short release. Release is commonly switched with a sustain pedal so the decay phase sets the release shape whilst depressed. You can, of course, build your patch as though the foot pedal is permanently depressed, great for electric pianos but watch polyphony. Shape A is most common.
Filter – mid to low start position to emphasize the low to mid harmonics (the body) but commonly with a positive Envelope in the A & D shapes. Having velocity control the filter env is a great way to help overcome static sounds.
LFOs – a ‘real’ piano will have no modulation, however electric pianos commonly have tremolo (LFO to Amplitude). Subtle use of LFO to pitch & filter can have magical results. Too much pitch mod will tend to turn a piano into a guitar sound.
Bells
Bells are complex timbres, commonly with some less well-tuned overtones. Hard to make photo-real but very easy to approximate or make new sound effects.
Tuning – best tuned to middle C but one octave up or down can help bring out a brighter or richer tone respectively.
Amplitude – shape A is all you really need. Be sure to set decay and release the same as a bell has no sustain (unless you are building a Pad).
Filter – the trick in bell sounds is that the filter opens immediately and decays like the amplitude. The timings will have a huge impact on the final sound. You can add more overtones by adding resonance, but not too much as this isn’t a 303.
LFOs – there are two uses for LFOs; the broadest is in simple vibrato which emulates the ‘shimmer’ of a bell. The second usage seems less vital but can have a massive impact on the sound, a pronounced pitch modulation to create a more complex waveform. Too much and it will sound chewed-up and off-key.
Brass
Brass sounds are one of my very fave. Once you have a bass and piano you can branch out into brass very simply by altering the filter envelope. Brass can be chords, melodies of rhythmic stabs.
Tuning – best tuned to middle C but one octave down can help bring out a richer tone.
Amplitude – shapes A, B, & D are most common but once you get the basics you can start to experiment with other options.
Filter – the trick in brass sounds is that the filter opens after the amp because in a real horn it takes a bit longer for the full harmonics to build than for the sound to start. That makes shape E your best friend. The timings will have a huge impact on the final sound. This is where you hope to have access to more complex envelope shapings like F to finesse the interaction of amplitude and tone. It is all bout subtlety of both filter and amp envelopes.
LFOs – there are two uses for LFOs. The broadest is in simple vibrato which is often best delayed till the tone is developed. The second usage seems less vital but can have a massive impact on the sound, a short but pronounced pitch modulation at the very start of the sound to emulate the ‘flapping of lips’ on the mouthpiece. You need to have an envelope to control the mod amount so this won’t be doable on every synth/sampler. Try different LFO waveforms.
Organs
Organ sounds are also pretty broad and cover everything from pipe organs to harmoniums and accordions. Mostly used to carry the chords and or melodic progression. Can also be used for basslines and effects. Electric organs are commonly also used for percussive effect.
Tuning – best tuned to middle C but some will sound better one octave lower.
Amplitude – very fast attack & release with full sustain. Shape C is almost all you will need.
Filter – mid to high start position to emphasize the mid to high harmonics (the body & cut). Commonly only a very small and very fast envelope in the A shape to create the chiff or percussion sound.
LFOs – officially no modulation on organs, however the popular Leslie rotating speaker effect can be adequately approximated by modulating any combination of pitch, amplitude and pan. The Leslie effect is considered an important part of the Rock organ (Hammond B3) sound so experiment with what suits the piece.
Strings
String sounds cover everything from solo violin to orchestral sections and classic string machine voicings. Mostly used to carry the chords and or melodic progression. Can also be used for percussive effect e.g pizzicato.
Tuning – best tuned to middle C but some will sound better one octave lower or higher. For large sections, you can add octaves above and below but watch the sound doesn’t become unwieldy and muddy up the mix. You may be better playing chords.
Amplitude – a quick attack and release with full some sustain. I tend to use a lot more release for a much fuller sound. Shapes B, E & D are the best starting-points with the exception of Pizzicato which is more A.
Filter – mid to high start position to emphasize the mid to high harmonics (the body & cut). Commonly only a very small and fast envelope in the A shape. Filter key tracking will have a large influence on how your instrument behaves over the keyboard I commonly start with 50% tracking. If you have a high pass filter you can locate and cut a portion off the fundamental to thin the overall sound, remember to set this filter to track key 100%.
LFOs – vibrato is an important part of the string sound so experiment with what suits the piece. Also be prepared to alter the modulation amount over time with another envelope or the Modulation Wheel. Paying attention to this will have a subtle but huge result on the depth of the performance.
Pads
Pads are very similar to string sounds and cover much of the same usage but most commonly in the chords. Some pads will have in-built rhythmic elements; build these to suit the piece (or build the piece around the sound).
Tuning – best tuned to middle C but some will sound better one octave lower or higher.
Amplitude – a mid to slow attack and release with sustain are most common. Shapes E, D & B are the best starting points. I tend to use a lot more release for a much fuller sound. Just don’t overdo attack & release or you can create a mushy mix with hanging and late notes. Solutions are to drag the MIDI notes earlier in time to offset the slow attack and use reverb and delay effects to fill the later sound.
Filter – position and filter movement are completely up to taste and the needs of the piece and mix. Either way, you want the pad to either fill most of the space or compliment the main instruments. Filtering and mixing will be based on usage – which can also change during the piece. Large envelope movement is not uncommon, any shape but C is likely.
LFOs – modulations of pitch, amplitude, filter and anything else that takes your fancy are fair game in a pad so long as it works in the piece.
Drums
We all know what drum sounds are, they are percussive, track time and add interest to a piece (or squash it completely). I covered drum synthesis before so will focus on some of the tricks when using non-Sine waves. If you want a DC click, move the sample start point off a zero-crossing. Best to really think like a sculptor and find the tones in your sample rather than try to force your complex oscillator to sound like a 909 sample.
Tuning – whatever does the job. Commonly synth drums are made with a Sine wave being pitched down sharply and added noise. With a more complex osc wave, you need another method so set your main pitch where you have a nice rich tone and work from there.
Amplitude – shape A is all you need. As you are working with a pitched sample then you will generally want to keep the envelope short so as to avoid the sense of pitch coming through in the patch. Samplers have generalist envelopes so you need to be subtle with times and accept limited movement in the bottom of the fader. Many synths offer a key-command to help with this like shift-click-drag in Reason.
Filter – with a complex wave you often have to build drums more from filters than the tone itself. Experiment with the filter shape that works best for each drum sound (e.g. LP for kick, BP for snare, HP for hats). Commonly I will use the A shape Env with a low filter start and high resonance to get the right balance of slap and thump. Do have a Limiter across the outs so you don’t lose a speaker cone.
LFOs – LFOs have no real place in kick drums but become invaluable in creating new, noisier & metallic tones from our single sample. Use fast rates with pitch to busy up the waveform for snare and hats.
Other Orchestral Instruments and general Polyphonic sounds – e.g. Woodwinds can generally be built on a variant of the brass model, but clarinets and oboes have little to no filter movement. Study each instrument to see which model it is closest to based on amplitude & timbral shape and you can make a workable replica of almost anything.
It Takes Two Baby
That covers the main categories based on shape of amplitude and timbre. Some extra things to help you are when and how to use multiple oscillators and effects. Remember right now we have only one shape for everything but we can use it many times at once.
Basic rule of multiple oscillators is that one osc is more direct & punchier, but many oscillators sound fatter; at the expense of true punch and timbral detail, esp if panned wide. There is no rule other than what works for the mix but try not to fall into the trap of making everything phat and wide in solo or you will make mush in the mix and not know how to recover as you won’t want to sacrifice the phatness of any soloed sound.
Bass – Very tempting to pile em up here but a single osc can punch far harder, esp in a busy mix (think 101 & 106). If you want to bully up the sound then consider things like a bit of distortion and compression to maximize the impression of the sound. If layered, LFO’d or chorussed, you can afford to be pretty deep in the modulation as bass is less pitch sensitive to the ear than treble. Again don’t overdo it into muddiness.
Pianos – I far prefer a single osc piano sound to multi-osc as they seem to sound too muddy. However a chorus can do wonders to fill and spread especially an electric piano sound. There is a trick you can use to add punch and even realism to a piano and that is to add a very short percussive layer to the start of the sound. You are chasing hammer sound more than chromatic so use any trick to make it punch, thump or click as required.
Bells – You can also add a second instance of the osc set to something like +3 semitones to busy up the core oscillator, just watch levels on the 2nd osc as you don’t want to hear it as a ‘chord’. Slightly detuned oscillators sound nice but immediately sound synthy. You can also use the ‘hammer’ trick from pianos above.
Brass – Add osc layers based on whether you are after a solo instrument or an ensemble – one osc for a solo trumpet but many for a Vangelis Blade Runner. Sometimes running a sub osc can be nice for a sound that plays higher up the register and doesn’t have much happening below in the mix.
Organs – If using only Sine waves then you want up to 9 oscillators stacked in the harmonic series as per a Hammond B3. However, with our complex wave, you may not need any layers. Slightly detuned osc will create a built-in chorus sound but may not overdrive as well as a single osc, chorused after the overdrive. Of course, you can try adding in layers based on octave and/or +7 semitones. Results will depend on the original waveform and osc levels.
Strings – Like brass, this depends on whether you are thinking solo or ensemble. I used to always use many, many layers but increasingly I use fewer osc and better application of choruses, delays and reverbs. You will find your way based on what you want and like.
Pads – Pads can greatly benefit from several to many layers. Sometimes that will be the same patch many times over, detuned and panned wide. Others it will be layers of complementary patches to make a greater whole. With one osc shape you may think we are limited but remember that trick where we used an LFO to complexify (and noisy-up) an osc. Pads can often really benefit from non-pitched sounds like noise or “scraped metal” moving around in the mix.
Voices – Voices & Choirs commonly use the string or pad shape models but use one or three tricks to get that vocal quality. If you have a Formant filter you can use that but there are other methods I prefer. Add quite a lot of LFO to pitch, just past a vibrato, but before Dr Who is a great start. Filtering to minimize the timbre is very useful as the human voice is a relatively simple tone with the ability to morph through a few shapes (A, E, I, O, uu and tss). Resonance helps a lot as it brings out the formanty sound of the human mouth. One osc or many will each have its own character, as will every osc shape (incl. noise).
Drums – Drums can be as detailed as you want to make them but I think two elements is plenty, esp if you want to keep the punch of the timbre. Avoid fine-detuned sounds as chorusing and drums are rarely a great match. A tone and noise are all you need, in the right balance of course. Don’t forget a liberal application of compression and even some reverb will help define your kit as a single unit.
Rock The Boat, Don’t Tip The Boat Over
Right now your brain may be hurting. Yep it is a lot. BUT if you haven’t already noticed, everything is a variant of volume & tone over time. Just accepting that fact and letting it settle in is a great start.
Choose the shape category you like best and spend a lot of time (days, weeks even) making those sounds (save em off as a patch bank for quick grabbifying later). See how adjusting one parameter affects the overall sound. Try to avoid many effects for now as the core of all synthesis is in OSC + Filter + Envs. Effects mask what you are doing.
Also, try using just the one oscillator wave over and over to see how many sounds you can pull out of one waveform. It will make a better synthesist of you and save you from panicking when you don’t have exactly the right sample to hand when you can build something close enough to order. Or something even cooler if you are a true synthesist.

Amazing! Thanks a lot for taking the time to make this.
No worries. Was a good question. 🙂