and how to win with Small Drums instead
Yup, making big sounding drums is difficult. But you say “listen up Lisa, listen up” (as Bart Simpson claps with one hand) but I bet you are about to show me a set of over-EQed, Compressed & Reverbed drums soloed. And when you drop those drums back into your mix you offer me a bowl of mush.
While I will admit to being no master of mixing, there is something that I learned early in my music making life and that is that a sound Solo is not the equal of that sound in a mix. I was taught to Solo a sound to work on noise and other problems but to keep the sound in the mix to make sonic adjustments, or when you put your magnificent sound back in the mix, nothing fits. Doubt me? Well then get an episode or three of Classic Albums and listen carefully to the sound of soloed tracks and notice how thin they sound, yet in the mix the music is magnificent. I rest my case.

I am an electronic musician so I will use what I know best which is drum machines but the theory applies just fine to acoustic. We will start with the classics of Roland CR-78, TR-606, TR-808 & Korg MiniPops; what these all have in common is that when you listen to a real one RAW, no processing, they are small, weedy sounds despite their presence in a mix.
So let’s try making drums differently and build the drum sounds after the bulk of the mix is made. For many of you this may be a real challenge as it flips your way of working. If you can’t write without a 909 on the 4 and a 303 on your 6 (hihi) then write as you do then come back and mute your existing sounds and start again till you get the lesson.
Theory
The human brain is a pattern recognizing system far more than a seer of actual truth. A drum in the real world is a punch sound and this is what appears to make it the basis of a mix. So on record we want to achieve the same thing. Let the drums add punch to the piece instead of being the mix. It is all in the impression not in actual fact. Like Zen riddles you need to point to the thing and let the listener find it themselves. It is in that trick that the magic lies and don’t never go forgettin’ that young man.
The other great truism is that low freqs have very little distinctive character compared to middle freqs no matter how much you want to deny this. Reason is that the human brain gets the most info from mid frequencies and to us very low (under about 100Hz) and very high tones (above about 3kHz) sound rather similar. We make most decisions based on what is in the middle so to get a person to see difference you need to hook attention in these areas, and if people don’t notice the hook you are a clever fisherman indeed.
The whole trick is that a percussive sound has two effective parts; Attack & Body and they affect each other to the point of cancelling each other out so you first need to decide if you are after tick or oof in your sound (bear with me if you want both).
Practice
I’ll show you a thing or two using Propellerheads Kong as it is a mightily flexible drum synth. Well start with Kick as to most of you this the source of all joy in life.
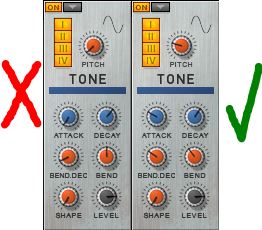
We’ll use only a Tone module using a Sine wave and while I know you want to set the Pitch as low as you can to get bowel shaking tones, don’t. Set the initial Pitch a bit higher, as if you were seeking a low Tom instead. Add some Pitch Envelope to the sound. Between the Amount of the Pitch Mod and the Time it takes for the Pitch to settle (Decay) you get a large variety of different sounds. A large pitch Depth adds pop to the sound and the longer the pitch Decay the less oomph you get but the more character the sound has.
The second part is the Amplitude shape of the sound. A very short Attack will emphasize the tick of the sound but you’ll find you can’t get that 909 sound with a short Attack as the click swallows the welly you so crave. Slow the Attack and lengthen the Decay and suddenly you have a mighty thump.
Play with these two axis till you have a fair understanding of how they play-off against each other. I mean this as if you only spend 5 seconds on this then you will walk away with nothing and it may take you 20 years to get back to this point (he says from personal experience).
So you think you deserve both tick and oof in the same sound because you are a child of the 90’s and deny that anything should be denied? Well we can trick ourselves into that too. What we HAVE to do is layer. We can layer with Parallel Processing at the Mixer but here I will show you how by adding another sound generator.

Insert a Noise module next to the Tone module and turn the Click all the way down as right now you won’t learn as much with it on. Trust me as I am a car salesman and musician which is the equivalent of being a double-devil so I know how to be tricky 😉 Set the Attack to very short and the Decay to pretty short too. An initial rule of thumb may be to set the Decay to be about matching the Attack of the Tone portion. This means that the noise sounds before the body of the Tone.
You will need to do some adjusting to the tone of the Noise portion as if it is too bright or loud it will sound like you have a pair of sounds. Get the noise so it just picks up the front of your sound. You will quickly notice that small adjustments to the noise have large results in the final sound. If you didn’t already, read the Theory section above.
You will suddenly notice that you have a tick to your sound as well as a fat oof body. Sneaky. Well us old 70’s & 80’s dudes worked a thing or three out all of ourselves we did. This is why the High Hats were often tied to the Kick sound as they helped pull the little thump of a 606 into the front of a mix. Clever stuff and a wonderful sound. In real kick drums, the engineer would do things like tape a credit card onto where the beater struck to get extra click. Combinations of sounds are a huge part of why we love those 80’s patterns which is why people sample them.

Now take these tips and apply them to other percussive sounds:
- Snare: short Tone that speaks before the Noise section or drop the Tone altogether for that ultra small Techno sound
- Toms: are generally all Tone with a long Pitch Decay but if you want that Simmons sound then pop Noise on the front like a Kick. Variety is spice here so practice mightily for your own sound
- High Hats: are really all noise (unless you take the pulse wave route) and careful tuning and Enveloping. EQ often plays a big part here and don’t assume higher is better.
- Cymbals: are often just oversized hats
- Cowbells: don’t laugh as those extra sounds added to the pattern give so much character missing in modern drum machines. Generally use two Tones and offset them
– – –
To help you understand the style of working I advocate here, listen to John Foxx’s “Metamatic” album or Heaven 17’s “Penthouse & Pavement” album (not later mixes) as they are both wonderful examples of mixing small to make big. As a matter of interest “Penthouse & Pavement” is a very important album in the progression of modern post-Disco dance in both sound and stance. Also interesting to note how drum sounds change on their next album “The Luxury Gap” as technology and methods expand.
The next step is to beef up your sound using compression

Great stuff! Thanks for sharing your knowledge.i had heard about this technique but often forget to implement. Great sound now from my sine 909 kick.
I am little confused about the noise generator part. I do not have reason so used analog (Ableton) white noise generator but yours only shows a reso filter. In Ableton analog there is no sound from reso except when filter cut of is tweaked. Also what about filter for noise gen? high or low pass or any?
Thanks again for insight and seems I have “that” 909 kick (or nearly) that I was after. I will keep tweaking about but hope you can help me out.
Hi Mark. Thanks for your Q. I don’t know Analog from Live well but it is a general synth with two discrete Filters so now you have the Tone happening, adding Noise is not too hard. Assign the Noise OSC to Filter 2 (not that you really need Filter 1 for the Tone part but just in case you used it). Start with a BandPass shape and adjust Freq & Reso to suit your mix needs. If you can have a separate Env for the Amp of the Noise even better, otherwise use the Filt Env to get the right shape.